Animating Multiple Pixel Bender Lights

March 21, 2009

Intro
Having multiple lights in PV3D is a desired effect. But after going through the lightmap classes, let me say that it’s impossible without an major rewrite. But with Pixel Bender all you do is add another term to your pbk filter…let’s do it!

Animating Pixel Bender Lights

Animating Pixel Bender Lights

Demo

Source

Discussion

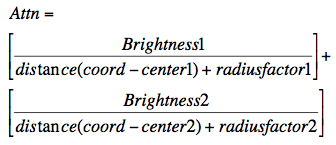
It’s an amazingly simple process. Just add another term to your pixel bender light equation as shown below:
Adding Multiple Images to PV3D

Adding Multiple Images to PV3D

The example above only shows two lights, but you can have as many lights as you want just by adding additional light terms:

The pixel bender code looks like this

float2 outcoord = outCoord();
float attn = (brightness1/((distance(outcoord, center1)+radius1)))+(brightness2/((distance(outcoord, center2)+radius2)));

dst = attn* sampleNearest(src, outcoord);
dst.a=1.0;

Wow, only five lines of code to have multiple light sources – get out of here!

Animating Your Sources

Once you’ve set your shader up then animating it is pretty easy. If you aren’t sure how to set up your shader for animation, check out Lee Brimlow’s video on animating shaders. I do it a little differently than Lee, but not by much. Here are the steps for animating the lights:

  1. Increment your oscillation parameter osc++
  2. Calculate sine and cosine based upon your incremented osc
  3. Update your light positions
  4. Apply the update to your image

The fully documented code is shown below:

private function loop(e:Event):void{

//Increment your oscillation parameter
osc++;
//Calculate sine and cosine
var cos:Number=150*Math.cos(osc/10);
var sin:Number=150*Math.sin(osc/10);
//Update your light positions
shader.data.center1.value = [sin+400, cos+180];
shader.data.center2.value = [cos+200, sin+180];
//Apply the update to your image
image.filters = [filter];
//Rotating your image holder
holder.rotationY+=.25;
}

If you are aware of how hard this is to do in PV3D, you’re going wow…tell me more…and we will…

For the entire source code download the source above, or check out the link below:
Read the rest of this entry »


Adding Pixel Bender to Papervision3D

March 20, 2009

Intro

One of the things which I abhor about modeling in Papervision3D is texture baking. And if you’ve been in the business as long as I have you know why…it’s a labor intensive nightmare…and you can’t ever get it right. But with pixel bender you don’t have to bake your textures anymore and you can adjust your parameters dynamically using ActionScript.

Dynamic Shading using Pixel Bender

Dynamic Shading using Pixel Bender

Demo

Source

YouTube http://www.youtube.com/watch?v=i8BnSqf0Z_g

Discussion

Adding Pixel Bender to Papervision3D was a three step process:

  • Creation of a Pixel Bender Filter
  • Creation of a Pixel Bender Bitmap File Material Class
  • Creation of a Pixel Bender Bitmap Material Class
Adding Pixel Bender to PV3D

Adding Pixel Bender to PV3D

Before you start coding. Make sure you’ve switched to the Flash 10 player!!!

Step 1: In the previous post several pixel builder filters were presented.

Pixel Bender Filters and Algorithms

To create a dynamic light baker filter the simple light filter was modified by throwing out all the pow and exponent methods. The big trick is that exponential behavior can be mimicked by using inverse of distance –now that’s a processor saver. The final algorithm use is shown below:

lively3d Light Source for Texture Baking

lively3d Light Source for Texture Baking

The pixel bender algorithm is easily implemented using the code below:

float2 outcoord = outCoord();
float attn = (brightness/((distance(outcoord, center)+radius)));

dst = attn* sampleNearest(src, outcoord);
dst.a=1.0

In addition to the modification mentioned above the alpha component is split off and set to one. This keeps the images from losing its alpha as you reduce brightness.

Step 2: Next you must create a Pixel Bender Bitmap File Material Class. This is simply done by making a copy of PV3D’s BitmapFileMaterial class and renaming it BitmapBendMaterial class and after changing the constructor and class names extend this class by the BitmapPixelMaterial class.

BitmapBendMaterial extends BitmapPixelMaterial

You’ll now create the BitmapPixelMaterial class.

Step 3: Make a copy of the PV3D BitmapMaterial class and name it BitmapPixelMaterial. Add the appropriate import statements and the pbj and image embed methods and create a shader as shown below:

[Embed (source=”filters/livelyLight.pbj”,
mimeType=”application/octet-stream”)]
private var ShaderClass:Class;

[Embed (source=”assets/images/gainesHouse512.jpg”)]
private var myImage:Class;

private var shader:Shader

Next incorporate the code to get your shader and image working together:

shader = new Shader(new ShaderClass());
shader.data.center.value = [400, 306];
shader.data.brightness.value = [150];
shader.data.radius.value = [100];

var image:Bitmap = new myImage();
image.filters = [new ShaderFilter(shader)];
shader.data.src.input = image.bitmapData

Finally you must change your fill method to a shader fill method with a matrix method

graphics.beginShaderFill(shader,_localMatrix)

That’s it! To check out the wrapper code download the source or click the more button below:

Read the rest of this entry »